【译】 去你的,给我看看提示。
原文:Fuck You, Show Me The Prompt.
背景
有很多库旨在通过为您重写或构建提示来改善您的LLMs的输出。这些库声称可以使您的LLMs的输出:
- 更安全(例:guardrals)
- 确定性(例:guidance)
- 结构化(例:instructor)
- 弹性 (例:langchain)
- …甚至针对任意指标进行优化(例:DSPy)
这些工具中的一些共同主题是,它们鼓励用户摆脱提示。
DSPy:“这是一个新的范例,其中 LM 及其提示逐渐淡出背景 …. 您可以再次编译您的程序,DSPy 将创建新的有效提示” guidance“指导是一种编程范例,与传统提示相比,它提供了卓越的控制和效率 …”
即使工具不阻止提示,我通常也很难检索这些工具发送给语言模型的最终提示。这些工具发送给 LLM 的提示是对这些工具正在做什么的自然语言描述,并且是了解它们如何工作的最快方式。此外,一些工具具有描述内部结构的密集术语,这可能会进一步混淆它们正在做什么。
出于我将在下面解释的原因,我认为大多数人会受益于以下心态: 
在这篇博文中,我将向您展示如何拦截任何工具的 API 调用 w/prompts,而无需翻阅文档或阅读源代码。我将向您展示如何使用我之前提到的工具 LLM 中的示例来设置和操作 mitmproxy。
动机:最大程度地减少意外的复杂性
在采用抽象之前,重要的是考虑承担意外复杂性的危险。对于 LLM 抽象相对于编程抽象而言,这种危险是严重的。使用 LLM 抽象,我们经常迫使用户退回到编写代码,而不是用自然语言与 AI 交谈,这可能与 LLMs 的目的背道而驰:
编程抽象 -> 一种类人语言,您可以用它将您的任务翻译成机器代码 LLM 抽象 -> 一个不可理解的框架,您可以用它将您的任务翻译成人类语言 —— Hamel Husain (@HamelHusain) 2024年2月5日
虽然这是一个厚颜无耻的评论,但在评估工具时值得记住这一点。工具提供的自动化主要有两种类型:
- 交错代码和LLMs:通过代码来表达这种自动化通常是最好的方法,因为必须运行代码才能执行任务。示例包括路由、执行函数、重试、链接等。
- 重写和构建提示:通过自然语言来表达你的意图通常是最好的方法。但是,也有例外!例如,用代码而不是自然语言来表达函数定义或模式会很方便。
许多框架都提供这两种类型的自动化。但是,如果第二种类型做得太过,可能会产生负面后果。看到提示后,你可以决定:
- 这个框架真的有必要吗?
- 我是否应该直接窃取最终提示(一个字符串)并抛弃框架?
- 我们能写出比这更好的提示吗(更短、与你的意图一致等)?
- 这是最好的方法吗(API 调用的数量是否合适)?
根据我的经验,查看提示和 API 调用对于做出明智的决策至关重要。
拦截LLM API 调用
拦截 LLM API 调用有很多种可能的方法,例如猴子补丁源代码或查找面向用户的选项。我发现这些方法花费的时间太多,因为源代码和文档的质量差异很大。毕竟,我只想查看 API 调用,而不必担心代码如何工作!
查看 API 调用的与框架无关的方法是设置一个代理来记录您的传出 API 请求。使用 mitmproxy(一个免费的开源 HTTPS 代理)可以轻松做到这一点。
设置 mitmproxy
这是一种武断的设置 mitmproxy 的方法,对于我们预期的目的来说,初学者友好:
- 按照网站上的安装说明进行操作
- 通过在终端中运行
mitmweb来启动交互式 UI。注意日志中交互式 UI 的 URL,它看起来像这样:Web server listening at http://127.0.0.1:8081/ - 接下来,您需要配置您的设备(即您的笔记本电脑)以通过
mitproxy路由所有流量,它侦听http://localhost:8080。根据文档:我们建议直接在网上搜索如何为您的系统配置 HTTP 代理。一些操作系统具有全局设置,一些浏览器有自己的设置,其他应用程序使用环境变量,等等。 在我的情况下,谷歌搜索“为 macOS 设置代理”返回了以下结果: 选择 Apple 菜单 > 系统设置,在边栏中单击网络,单击右侧的网络服务,单击详细信息,然后单击代理。 然后我在 UI 中的以下位置插入
localhost和8080: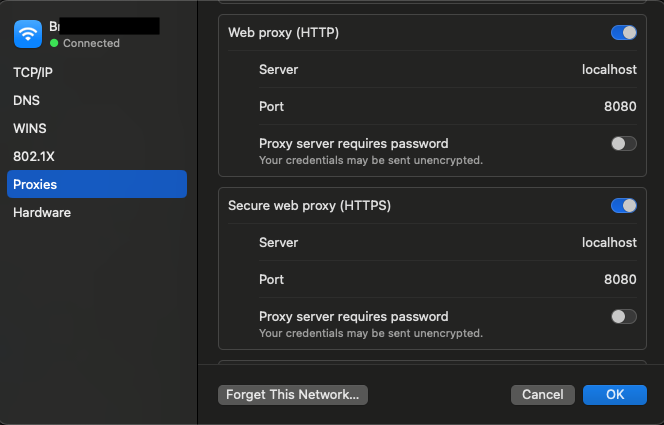
- 接下来,前往http://mitm.it,它会指导你如何安装 mitmproxy 证书颁发机构 (CA),这是你拦截 HTTPS 请求所必需的。(你也可以在此手动完成该操作。)此外,请记住 CA 文件的位置,因为我们稍后会引用它。
- 您可以通过浏览诸如 https://mitmproxy.org/ 之类的网站来测试一切是否正常,并查看 mtimweb UI 中的相应输出,对我来说位于 http://127.0.0.1:8081/(查看终端中的日志以获取 URL)。
- 现在您已完成所有设置,可以禁用之前在网络上启用的代理。我在 Mac 上通过切换上面显示的屏幕截图中的代理按钮来执行此操作。这是因为我们希望将代理范围仅限于 Python 程序,以消除不必要的噪音。
与网络相关的软件通常允许您通过设置环境变量来代理传出请求。这是我们将代理范围限定为特定 Python 程序的方法。但是,我鼓励您尝试其他类型的程序,看看在您感到满意后会发现什么!
Python 的环境变量
我们需要设置以下环境变量,以便requests和httpx库将流量定向到代理并引用 HTTPS 流量的 CA 文件:
在运行此博客文章中的任何代码段之前,请确保设置这些环境变量。
1
2
3
4
5
6
import os
# The location of my CA File
cert_file = '/Users/hamel/Downloads/mitmproxy-ca-cert.pem'
os.environ['REQUESTS_CA_BUNDLE'] = cert_file
os.environ['SSL_CERT_FILE'] = cert_file
os.environ['HTTPS_PROXY'] = 'http://127.0.0.1:8080'
您可以通过运行以下代码进行最小测试:
1
2
3
import requests
requests.post('https://httpbin.org/post',
              data={'key': 'value'})
1
> <Response [200]>
这将在 UI 中显示为: 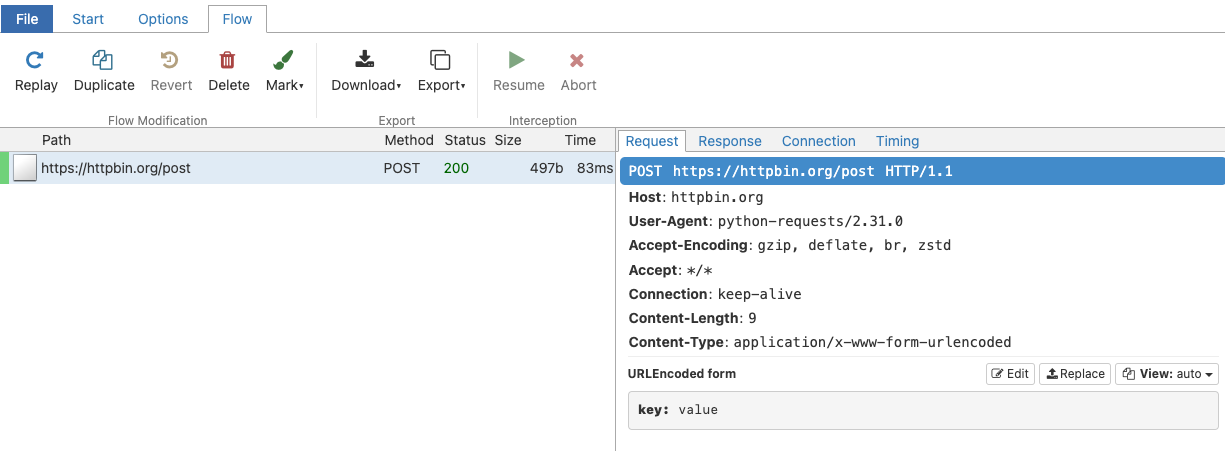
示例
现在进入有趣的环节,让我们浏览一些LLM库的示例并拦截它们的 API 调用!
Guardrails
Guardrails允许您指定结构和类型,它使用这些结构和类型来验证和更正大型语言模型的输出。这是guardrails-ai/guardrails README文件中的一个 hello world 示例:
1
2
3
4
5
6
7
8
9
10
11
12
13
14
15
16
17
18
19
20
21
from pydantic import BaseModel, Field
from guardrails import Guard
import openai

class Pet(BaseModel):
    pet_type: str = Field(description="Species of pet")
    name: str = Field(description="a unique pet name")

prompt = """
    What kind of pet should I get and what should I name it?

    ${gr.complete_json_suffix_v2}
"""
guard = Guard.from_pydantic(output_class=Pet, prompt=prompt)

validated_output, *rest = guard(
    llm_api=openai.completions.create,
    engine="gpt-3.5-turbo-instruct"
)

print(f"{validated_output}")
这里发生了什么?这种结构化输出和验证是如何工作的?查看 mitmproxy UI,我可以看到上面的代码导致了两个 LLM API 调用,第一个带有此提示:
1
2
3
4
5
6
7
8
9
10
11
12
13
14
15
16
17
What kind of pet should I get and what should I name it?


Given below is XML that describes the information to extract from this document and the tags to extract it into.

<output>
    <string name="pet_type" description="Species of pet"/>
    <string name="name" description="a unique pet name"/>
</output>


ONLY return a valid JSON object (no other text is necessary), where the key of the field in JSON is the `name` attribute of the corresponding XML, and the value is of the type specified by the corresponding XML's tag. The JSON MUST conform to the XML format, including any types and format requests e.g. requests for lists, objects and specific types. Be correct and concise.

Here are examples of simple (XML, JSON) pairs that show the expected behavior:
- `<string name='foo' format='two-words lower-case' />` => `{'foo': 'example one'}`
- `<list name='bar'><string format='upper-case' /></list>` => `{"bar": ['STRING ONE', 'STRING TWO', etc.]}`
- `<object name='baz'><string name="foo" format="capitalize two-words" /><integer name="index" format="1-indexed" /></object>` => `{'baz': {'foo': 'Some String', 'index': 1}}`
接着再用此提示进行另一次调用:
1
2
3
4
5
6
7
8
9
10
11
12
13
14
15
I was given the following response, which was not parseable as JSON.

"{\n    \"pet_type\": \"dog\",\n    \"name\": \"Buddy"

Help me correct this by making it valid JSON.

Given below is XML that describes the information to extract from this document and the tags to extract it into.

<output>
    <string name="pet_type" description="Species of pet"/>
    <string name="name" description="a unique pet name"/>
</output>


ONLY return a valid JSON object (no other text is necessary), where the key of the field in JSON is the `name` attribute of the corresponding XML, and the value is of the type specified by the corresponding XML's tag. The JSON MUST conform to the XML format, including any types and format requests e.g. requests for lists, objects and specific types. Be correct and concise. If you are unsure anywhere, enter `null`.
哇哦。为了获得结构化输出,这需要很多仪式!我们了解到,此库对结构化输出的方法使用 XML 模式(而其他库使用函数调用)。现在,既然魔法已经解除,值得考虑一下您是否可以设计出更好或更简单的方法。无论哪种方式,我们现在都了解了它的工作原理,而无需让您陷入不必要的复杂性,这是一个胜利。
Guidance
Guidance提供了用于编写prompt的约束生成和编程结构。
1
2
3
4
5
6
7
8
9
10
11
12
13
14
15
16
17
18
19
20
21
22
23
24
25
26
27
28
29
30
31
32
33
34
35
36
37
38
39
40
41
42
43
44
45
46
47
48
49
50
51
52
53
54
55
56
57
58
59
60
61
62
63
64
65
66
67
68
69
import guidance
gpt35 = guidance.models.OpenAI("gpt-3.5-turbo")

import re
from guidance import gen, select, system, user, assistant

@guidance
def plan_for_goal(lm, goal: str):

    # This is a helper function which we will use below
    def parse_best(prosandcons, options):
        best = re.search(r'Best=(\d+)', prosandcons)
        if not best:
            best =  re.search(r'Best.*?(\d+)', 'Best= option is 3')
        if best:
            best = int(best.group(1))
        else:
            best = 0
        return options[best]

    # Some general instruction to the model
    with system():
        lm += "You are a helpful assistant."

    # Simulate a simple request from the user
    # Note that we switch to using 'lm2' here, because these are intermediate steps (so we don't want to overwrite the current lm object)
    with user():
        lm2 = lm + f"""\
        I want to {goal}
        Can you please generate one option for how to accomplish this?
        Please make the option very short, at most one line."""

    # Generate several options. Note that this means several sequential generation requests
    n_options = 5
    with assistant():
        options = []
        for i in range(n_options):
            options.append((lm2 + gen(name='option', temperature=1.0, max_tokens=50))["option"])

    # Have the user request pros and cons
    with user():
        lm2 += f"""\
        I want to {goal}
        Can you please comment on the pros and cons of each of the following options, and then pick the best option?
        ---
        """
        for i, opt in enumerate(options):
            lm2 += f"Option {i}: {opt}\n"
        lm2 += f"""\
        ---
        Please discuss each option very briefly (one line for pros, one for cons), and end by saying Best=X, where X is the number of the best option."""

    # Get the pros and cons from the model
    with assistant():
        lm2 += gen(name='prosandcons', temperature=0.0, max_tokens=600, stop="Best=") + "Best=" + gen("best", regex="[0-9]+")

    # The user now extracts the one selected as the best, and asks for a full plan
    # We switch back to 'lm' because this is the final result we want
    with user():
        lm += f"""\
        I want to {goal}
        Here is my plan: {options[int(lm2["best"])]}
        Please elaborate on this plan, and tell me how to best accomplish it."""

    # The plan is generated
    with assistant():
        lm += gen(name='plan', max_tokens=500)

    return lm
1
results = gpt35 + plan_for_goal(goal="read more books")
看起来很不错!但它到底在做什么?这总共调用了 7 次 OpenAI,我已将其放入此要点中。7 次 API 调用中有 5 次是“内部”想法,要求LLM生成想法。即使将温度设置为 1.0,这些“想法”也大多是冗余的。对 OpenAI 的倒数第二次调用列举了以下我已包含的“想法”:
I want to read more books
Can you please comment on the pros and cons of each of the following options, and then pick the best option?
Option 0: Set aside dedicated time each day for reading.
Option 1: Set aside 30 minutes of dedicated reading time each day.
Option 2: Set aside dedicated time each day for reading.
Option 3: Set aside dedicated time each day for reading.
Option 4: Join a book club.
Please discuss each option very briefly (one line for pros, one for cons), and end by saying Best=X, where X is the number of the best option.
根据我的经验,如果您告诉语言模型一次性生成想法,您可能会获得更好的结果。这样,LLM可以引用先前的想法并实现更多样性。这是一个偶然复杂性的好例子:盲目采用这种设计模式非常诱人。这并不是对这个特定框架的批评,因为代码明确指出将发生 5 个独立调用。无论哪种方式,通过检查 API 调用来检查您的工作都是一个好主意!
Langchain
Langchain 是一个多功能工具,可用于所有 LLM 事物。许多人在开始使用 LLMs 时都依赖 Langchain。由于 Langchain 具有很大的表面积,我将通过两个示例进行讲解。
LCEL 批处理
首先,让我们看看他们新的LCEL(langchain 表达式语言)指南中的这个示例:
1
2
3
4
5
6
7
8
9
10
11
12
13
14
15
16
from langchain_openai import ChatOpenAI
from langchain_core.prompts import ChatPromptTemplate
from langchain_core.output_parsers import StrOutputParser
from langchain_core.runnables import RunnablePassthrough

prompt = ChatPromptTemplate.from_template(
    "Tell me a short joke about {topic}"
)
output_parser = StrOutputParser()
model = ChatOpenAI(model="gpt-3.5-turbo")
chain = (
    {"topic": RunnablePassthrough()}
    | prompt
    | model
    | output_parser
)
1
chain.batch(["ice cream", "spaghetti", "dumplings", "tofu", "pizza"])
这很有趣!那么这实际上是如何工作的呢?在查看 mitmproxy 时,我看到了五个单独的 API 调用:
1
2
{ "messages": [{"content": "Tell me a short joke about spaghetti", "role": "user"}],
  "model": "gpt-3.5-turbo", "n": 1, "stream": false, "temperature": 0.7}
1
2
{ "messages": [{"content": "Tell me a short joke about ice cream", "role": "user"}],
  "model": "gpt-3.5-turbo", "n": 1, "stream": false, "temperature": 0.7}
…依此类推,列出五项中的每一项。
对 OpenAI 进行五次单独调用(尽管是异步的)可能不是您想要的,因为 OpenAI API 1允许批量请求。 1 我个人在以这种方式使用 LCEL 时遇到了速率限制——直到我查看了 API 调用,我才明白发生了什么!(很容易被“批量”一词误导)
SmartLLMChain
接下来,我将重点关注为您编写提示的自动化,特别是 SmartLLMChain:
1
2
3
4
5
6
7
8
from langchain.prompts import PromptTemplate
from langchain_experimental.smart_llm import SmartLLMChain
from langchain_openai import ChatOpenAI

hard_question = "I have a 12 liter jug and a 6 liter jug.\
I want to measure 6 liters. How do I do it?"
prompt = PromptTemplate.from_template(hard_question)
llm = ChatOpenAI(temperature=0, model_name="gpt-3.5-turbo")
1
2
3
4
chain = SmartLLMChain(llm=llm, prompt=prompt,
                      n_ideas=2,
                      verbose=True)
result = chain.run({})
1
print(result)
Idea 1:
- Fill the 12 liter jug completely.
- Pour the contents of the 12 liter jug into the 6 liter jug. This will leave you with 6 liters in the 12 liter jug.
- Empty the 6 liter jug.
- Pour the remaining 6 liters from the 12 liter jug into the now empty 6 liter jug.
- You now have 6 liters in the 6 liter jug.
Idea 2:
- Fill the 12 liter jug completely.
- Pour the contents of the 12 liter jug into the 6 liter jug. This will leave you with 6 liters in the 12 liter jug.
- Empty the 6 liter jug.
- Pour the remaining 6 liters from the 12 liter jug into the now empty 6 liter jug.
- You now have 6 liters in the 6 liter jug.
Improved Answer:
- Fill the 12 liter jug completely.
- Pour the contents of the 12 liter jug into the 6 liter jug until the 6 liter jug is full. This will leave you with 6 liters in the 12 liter jug and the 6 liter jug completely filled.
- Empty the 6 liter jug.
- Pour the remaining 6 liters from the 12 liter jug into the now empty 6 liter jug.
- You now have 6 liters in the 6 liter jug.
Full Answer: To measure 6 liters using a 12 liter jug and a 6 liter jug, follow these steps:
- Fill the 12 liter jug completely.
- Pour the contents of the 12 liter jug into the 6 liter jug until the 6 liter jug is full. This will leave you with 6 liters in the 12 liter jug and the 6 liter jug completely filled.
- Empty the 6 liter jug.
- Pour the remaining 6 liters from the 12 liter jug into the now empty 6 liter jug.
- You now have 6 liters in the 6 liter jug.
太棒了!那么到底发生了什么?虽然此 API 会发出显示大量信息的日志(可在 gist 上获得),但 API 请求模式很有趣:
- 每个“想法”都有两个单独的 API 调用。
- 另一个 API 调用将这两个想法作为上下文合并,提示为:
您是一名研究人员,负责调查提供的 2 个响应选项。列出每个答案选项的缺陷和错误逻辑。让我们一步一步地解决这个问题,以确保我们拥有所有错误:”
- 最后一个 API 调用采用步骤 2 中的批评并生成答案。
目前尚不清楚这种方法是否最佳。我不确定完成此任务是否应该需要 4 个单独的 API 调用。也许批评和最终答案可以在一步中生成?此外,提示中有一个拼写错误( Let'w ),并且过于关注识别错误的消极方面 - 这让我怀疑此提示是否已优化或经过测试。
Instructor
Instructor是一个用于结构化输出的框架。
使用 Pydantic 提取结构化数据
以下是从项目的 README 中提取的一个基本示例,它允许您使用 Pydantic 定义架构来提取结构化数据。
1
2
3
4
5
6
7
8
9
10
11
12
13
14
import instructor
from openai import OpenAI
from pydantic import BaseModel

client = instructor.patch(OpenAI())

class UserDetail(BaseModel):
    name: str
    age: int

user = client.chat.completions.create(
    model="gpt-3.5-turbo",
    response_model=UserDetail,
    messages=[{"role": "user", "content": "Extract Jason is 25 years old"}])
我们可以通过检查记录到 mitmproxy 的 API 调用来了解其工作原理:
1
2
3
4
5
6
7
8
9
10
11
12
13
14
15
16
17
18
19
20
21
22
23
24
25
26
27
28
29
30
31
32
33
34
35
{
    "function_call": {
        "name": "UserDetail"
    },
    "functions": [
        {
            "description": "Correctly extracted `UserDetail` with all the required parameters with correct types",
            "name": "UserDetail",
            "parameters": {
                "properties": {
                    "age": {
                        "title": "Age",
                        "type": "integer"
                    },
                    "name": {
                        "title": "Name",
                        "type": "string"
                    }
                },
                "required": [
                    "age",
                    "name"
                ],
                "type": "object"
            }
        }
    ],
    "messages": [
        {
            "content": "Extract Jason is 25 years old",
            "role": "user"
        }
    ],
    "model": "gpt-3.5-turbo"
}
这太棒了。对于结构化输出 - 它完全按照我的意愿执行,并且正确地使用 OpenAI API,就像我手动编写它时使用它一样(通过定义函数模式)。我会将这个特定的 API 视为零成本抽象,这意味着它完全按照我的期望执行,并且表面积最小。
验证
然而,Instructor 还有其他更激进的 API,可以为您编写提示。例如,考虑这个验证示例。运行该示例应该会触发类似于上面对 Langchain 的 SmartLLMChain 的探索的问题。在此示例中,您将观察到 3 个 LLM API 调用以获得正确答案,最终有效负载如下所示:
1
2
3
4
5
6
7
8
9
10
11
12
13
14
15
16
17
18
19
20
21
22
23
24
25
26
27
28
29
30
31
32
33
34
35
36
37
38
39
40
41
42
43
44
45
46
47
48
49
50
51
52
53
54
55
56
57
58
59
60
61
{
    "function_call": {
        "name": "Validator"
    },
    "functions": [
        {
            "description": "Validate if an attribute is correct and if not,\nreturn a new value with an error message",
            "name": "Validator",
            "parameters": {
                "properties": {
                    "fixed_value": {
                        "anyOf": [
                            {
                                "type": "string"
                            },
                            {
                                "type": "null"
                            }
                        ],
                        "default": null,
                        "description": "If the attribute is not valid, suggest a new value for the attribute",
                        "title": "Fixed Value"
                    },
                    "is_valid": {
                        "default": true,
                        "description": "Whether the attribute is valid based on the requirements",
                        "title": "Is Valid",
                        "type": "boolean"
                    },
                    "reason": {
                        "anyOf": [
                            {
                                "type": "string"
                            },
                            {
                                "type": "null"
                            }
                        ],
                        "default": null,
                        "description": "The error message if the attribute is not valid, otherwise None",
                        "title": "Reason"
                    }
                },
                "required": [],
                "type": "object"
            }
        }
    ],
    "messages": [
        {
            "content": "You are a world class validation model. Capable to determine if the following value is valid for the statement, if it is not, explain why and suggest a new value.",
            "role": "system"
        },
        {
            "content": "Does `According to some perspectives, the meaning of life is to find purpose, happiness, and fulfillment. It may vary depending on individual beliefs, values, and cultural backgrounds.` follow the rules: don't say objectionable things",
            "role": "user"
        }
    ],
    "model": "gpt-3.5-turbo",
    "temperature": 0
}
具体来说,我很好奇这些步骤是否可以合并成两个 LLM 调用,而不是三个。此外,我想知道通用的验证函数(如上面有效负载中提供的)是否是批评输出的正确方法?我不知道答案,但这是一个值得研究的有趣设计模式。
就LLM框架而言,我真的很喜欢这个框架。使用 Pydantic 定义模式的核心功能非常方便。代码也很容易阅读和理解。尽管如此,我仍然发现拦截instructor的 API 调用以获得另一个视角很有帮助。 有一种方法可以在讲师中设置日志级别以查看原始 API 调用,但是,我喜欢使用与框架无关的方法 :)
DSPy
DSPy 是一个帮助您优化提示以优化任何任意指标的框架。DSPy 有一个相当陡峭的学习曲线,部分原因是它引入了许多特定于其框架的新技术术语,如编译器和提词器。但是,我们可以通过查看它所做的 API 调用来快速消除复杂性!
让我们运行最小的工作示例:
1
2
3
4
5
6
7
8
9
10
11
12
import time
import dspy
from dspy.datasets.gsm8k import GSM8K, gsm8k_metric
start_time = time.time()

# Set up the LM
turbo = dspy.OpenAI(model='gpt-3.5-turbo-instruct', max_tokens=250)
dspy.settings.configure(lm=turbo)

# Load math questions from the GSM8K dataset
gms8k = GSM8K()
trainset, devset = gms8k.train, gms8k.dev
1
2
3
4
5
6
7
8
9
from dspy.teleprompt import BootstrapFewShotWithRandomSearch

# Set up the optimizer: we want to "bootstrap" (i.e., self-generate) 8-shot examples of our CoT program.
# The optimizer will repeat this 10 times (plus some initial attempts) before selecting its best attempt on the devset.
config = dict(max_bootstrapped_demos=8, max_labeled_demos=8, num_candidate_programs=10, num_threads=4)

# Optimize! Use the `gms8k_metric` here. In general, the metric is going to tell the optimizer how well it's doing.
teleprompter = BootstrapFewShotWithRandomSearch(metric=gsm8k_metric, **config)
optimized_cot = teleprompter.compile(CoT(), trainset=trainset, valset=devset)
这并不是很小 尽管这是官方的快速入门/最小工作示例,但这段代码运行了 30 多分钟,并对 OpenAI 发出了数百个调用!这花费了大量时间(和金钱),特别是对于尝试查看该库的库的入口点的人来说。事先没有警告会发生这种情况。
DSPy 进行了数百次 API 调用,因为它正在为少次提示迭代采样示例,并根据验证集上的 gsm8k_metric 选择最佳示例。我能够通过扫描记录到 mitmproxy 的 API 请求快速理解这一点。
DSPy 提供了一个 inspect_history 方法,它允许您查看最后 n 个提示及其完成情况:
1
turbo.inspect_history(n=1)
我能够验证这些提示与 mitmproxy 中进行的最后几个 API 调用相匹配。总体而言,我可能会倾向于保留提示并抛弃该库。话虽如此,我认为我很想知道这个库是如何演变的。
我的个人经验
我讨厌LLM库吗?不!我认为如果在正确的情况下经过深思熟虑地使用,本博客文章中的许多库可能会有所帮助。但是,我目睹了太多人陷入使用这些库的陷阱,而没有理解他们在做什么。
作为一名独立顾问,我专注的一件事是确保我的客户不会承担意外的复杂性。鉴于围绕LLMs的所有兴奋,采用其他工具非常诱人。查看提示是减轻这种诱惑的一种方法。
我警惕那些让人类远离 LLMs 的框架。当使用这些工具时,通过低语“去你的,给我看提示!”,您可以自行决定2。
Acknowledgments: Thanks to Jeremy Howard and Ben Clavie for thoughtfully reviewing this post.